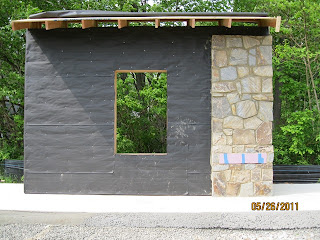
At the start of a project it is very important to construct an exterior wall mock up. The mock up is used for several purposes including material selections, constructability, and performance. This project team used the mock up for final exterior material selections and to review constructability details.
We first started by placing the concrete slab. This allowed us a trial run on the concrete mix design and resulted in some modifications to the mix design to allow the concrete to be more workable during the placement.
[mock up slab pour]
Next we framed the walls and roof with 2x wood framing and plywood sheathing. The building will be framed with FSC certified lumber. Then (2) layers of 15# felt paper were installed as the buildings vapor barrier. This is important to keep moisture out of the building.
[mock up wall framing and sheathing]
Next the stone veneer was installed. The stone is a locally sourced fieldstone found in close proximity to the project site.
[mock up stone veneer and cavity wall]
We sampled different mortar colors and joint types on the mock up so that the preferred color and joint method could be selected. On the bottom wall section we used a recessed joint and the top section is a flush joint. Because the stone has an irregular surface, the flush joint tends to look very wide. The team preferred the recessed joint on the bottom half of the wall. While installing the stone, the precast concrete sill was not yet available so we had to put in a piece of pink styrofoam to allow us to complete the stonework. Then when the precast concrete sill was fabricated, we were able to slide it right in without holding up the schedule.
[mock-up stone veneer]
A sample window was installed. The window is a Marvin aluminum clad wood window and the wood is FSC certified. Next a base course of Trex was installed at the watertable at the very bottom of the wall. Trex is very durable and corrosive resistant, does not need to be painted, and is made from 100% recycled material so it is a good choice for this application. Then the cedar trim was installed which will also be FSC certified. The roof is a painted aluminum standing seam metal roof with matching snow rails. The siding on this project is a cement board product, which is an alternative to wood siding. This is a good sustainable option because it is extremely durable, it outlasts wood, it holds paint very well, and it is also very fire resistant. We sampled two different colors and manufacturers and the team preferred the top half which is Hardie Plank Countrylane Red. The final step was to stain the cedar trim using a low VOC stain from Benjamin Moore.
[completed mock-up]
In addition to material selections, the team learned a great deal from the mock up. We were able to work out some dimensional details on the stone veneer. The concrete mix design was modified to allow a more workable mix. Most important were the details on the cement board siding and wood trim. This is not a standard everyday design because of the large exposure ship lap detailing. The carpenter foreman had to set up custom jigs and experiment with the blocking and shimming and corner details until he was able to find a good compromise that met the design intent and would be a durable long lasting detail. Again this is a very important exercise because it allows the team to work out many of the details on a small scale sample of the building that may not be evident on paper. It provides a hands on opportunity for the trades performing the work to get familiar with the installation and raise any concerns to the team before working on the actual building. This will ensure a better quality product and will avoid the potential for added costs and schedule impact down the road.


What a great post, thank you for sharing!
ReplyDeletewww.excavationdoneright.com/excavation-indianapolis
Thank you for sharing this amazing blog ! Affordable hardie shakes Surrey
ReplyDelete